March 29, 2016

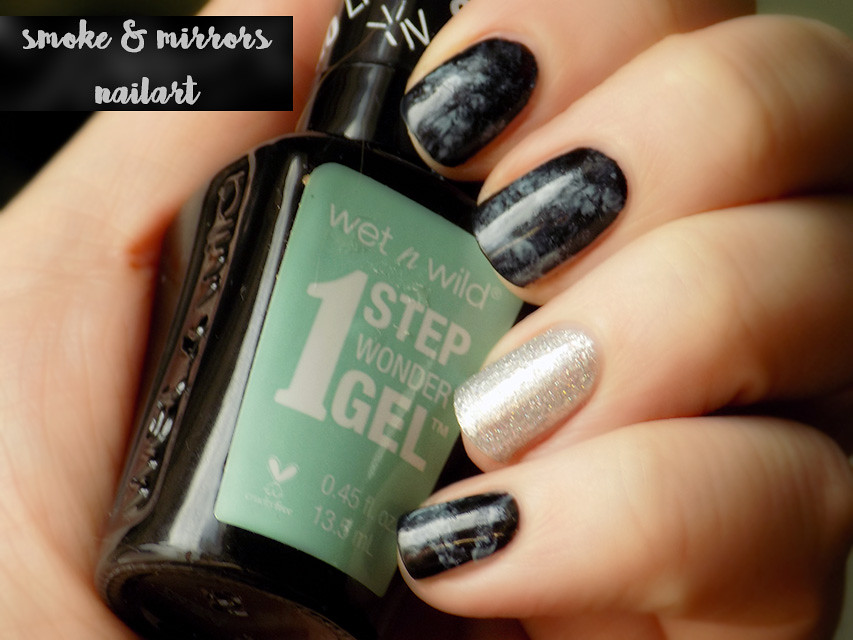
Guest Post From Tea & Nail Polish - Smoke & Mirrors Nail Art


Hi all,
Eithne from Tea & Nail Polish here taking over Michelle's blog today with my guest post - Smoke & Mirrors nail art tutorial.

June 19, 2015

Born Pretty Store White Tape Nail Art Edge Guide Review & Coupon Code

Hello readers,
Today I have some more nail art supplies from Born Pretty Store to try out.  I picked the white tape nail art edge guides because I thought they might be a good alternative to striping tape.


 Each packet comes with 44 guides.  On my first attempt at using them I discovered that they don't get along with my curvy nail beds.  As much as I press the ends down they kept lifting up.  I ended up using them in a design parallel to my nail which provided a flatter surface for them to stick to.  Here's what I came up with using Orly On The Edge as my Base Color and Femme Fatale The First Northern Witch as my accent colour.


Step 1: Place nail art guide vertically about a third in from the right edge of your nail over a completely dry base colour.

Step 2: Paint the exposed area with a different polish colour.

Step 3: Peel the nail guide off while the new polish is still wet.

Use the brush or a large dotting tool (whichever you're more comfortable with) to place large dots centered over the edge of the new polish colour.

Step 5: Use a smaller dotting tool to place dots of the base polish colour inside the larger dots from Step 4.

Step 6: Top coat!


Overall I think these nail guides have their uses.  I like that they are thicker so you don't have to worry about painting over the line like you do with striping tape and they do give a nice crisp edge.  I think for very intricate linear designs striping tape would be a better fit though.Don't forget if you plan to buy any nail art supplies from Born Pretty Store make sure to use the coupon code MSTK31 for 10% your order of regular priced items.

Happy polishing,

Michelle

June 04, 2014

Abstract Spring Flowers Nail Art

Hello readers,
Today I have some nail art that I did for a recent nail art contest held by Above The Curve Nail Polish.  The theme was spring so I decided to contrast bright spring flowers against white winter snow.

China Glaze Dandy Lyin' Around, Zoya Charisma, Zoya Katherine (jelly) and Color Club What A Drag
First I painted my nails white with CG Dandy Lyin' Around.  Next I dabbed Zoya Charisma up the edge of my nail and across the tip.  Then, I dabbed Zoya Katherine over the same area as Charisma making sure to cover any of the white gaps.


After waiting for that to completely dry I stamped a floral design from Moyou Pro Plate XL 06 using Color Club What A Drag.  Here are the results in natural lighting.


Happy polishing,

Michelle

January 04, 2014

Striping Tape - Episode I

Hello readers! I've had some striping tape sitting around for a few months but hadn't worked up the time/nerve/courage to actually give it a try. In honor of my 'Moar Nail Art!' new years resolution I decided to take the plunge. The results were... better than I anticipated. Based on reading other nail blogs and forums there were two key tips that stood out. 1) Wait until your nails are 100% completely dry before taping. Not dry to the touch or just after using a fast drying topcoat. Dry all the way through. I used a mani that I had already had on for a few days already as my base colour, so no issues there. 2) Make sure you pull the tape off while the polish is still when for crisp edges. Ok, I think I can handle that. I used Enchanted Polish Octopus's Garden as my base colour and China Glaze Cords as my taped accent colour. Here's what I came up with and how I did it.

 1) Tape a star pattern onto your nails using three pieces of striping tape.  For my design the pieces didn't really need to extend up past the top of my nails, but I found that made it easier to pull them off later.  I also taped up both hands right from the start.

2) Use your accent polish (CG Cords for me) to fill in the three triangles at the bottom of your nail. Then while the polish is still wet, peel off the striping tape.  For this design I found painting a whole hand and then removing the striping tape from that hand after worked alright.  Then, just repeat for the other hand.

3) I wanted to go a little further with my design so I used a small nail art brush to paint a smaller triangle of the base colour (EP Octopus's Garden for me) inside the center taped triangle.

4) Wait for the polish to become tacky/not easily smudge-able and then add your favorite top coat.


I really happy with this, especially for the first try.  As long as you make sure that your base polish is 100% dry and you peel the tape off while your accent polish is still wet striping tape isn't so hard.  I could see it being a small nightmare though if you didn't adhere to those two guidelines though.  Have you given striping tape nail art a try?  Do you have any must know tips to make it any easier?  I need to scour the interwebs now for other striping tape designs that catch my eye and can go on the "nail art to try" list.

Happy Polishing!

- Michelle

October 24, 2013

Sugar Spun Nail Art Tutorial

Hello readers!  Today I decided to take my fan brush's virginity and use it in my first attempt at sugar spun nails.  The end look is delicate stripes crisscrossing your nails.  I love this idea because a) each nail isn't expected to be 100% identical so if you mess up, no big deal! and b) the actual technique is pretty simple so you can achieve a good look on both hands.  I used Laquerlicious Unity Supreme Queen as my base colour and Zoya Carly and China Glaze Gossip Over Gimlets for the striping. Here's what my nails looked like after my first try and here's how I did it!


What You'll Need:

  • A fan brush
  • A base colour polish
  • Two accent colour polishes - these are for the stripes.
  • Top coat


  • How To Do It!
     1.  Apply base colour and wait until it's dry to the touch.

    2.  Take your fan brush and lightly dip the brush tips into the first accent.

    3.  Lightly drag the fan brush tips across your nail.  If the stripes do not cover your entire nail re-dip your fan brush in the polish and drag starting from the opposite side.

    4.  Repeat steps 3 and 4 using your second accent polish.

    5.  Wait a few minutes for stripes to start drying and add a topcoat. (The time in between helps avoid smudging the stripes.)

    I think you could do cute crisscrossing stripes with this technique too and end up with a kind of woven look.  I'll have to give that a try at some point.  I hope you found this tutorial helpful and I'll be back with more polish later this week!

    July 31, 2013

    Spotted Water Marbling Nail Art Tutorial

    Today I was inspired to try something new, spotted water marbling.  Specifically, I was inspired by this post I saw over on Cosmetic Sanctuary.  While I don't claim to have come up with this method, I will show you what worked best for me.  I don't think it looks too bad at all for a first attempt.  My middle nail is my personal favorite of the bunch.  I'm sure this is one of those methods that a bit of practice turns into lots of improvement.


    What you need:
    • Base colour polish (I used Pahlish Though Still And Storm)
    • Marbling polish(es) (I used Sally Hansen Black Diamond and Sequin Frost)
    • Plastic container
    • Room temperature water (filtered works a bit better, but not necessary)
    • Toothpick
    • Pump (not aerosol) hair spray (I used Herbal Essences Set Me Up hairspray)
    • Top coat
    • Clean up supplies (cotton pads, nail polish remover, etc.)

    Step 1: Paint your nails with your base colour and let them dry completely.


    Step 2: Put some water into your plastic container (ignore the black polish drop at the bottom, the first kind I tried sank).

    Step 3: Drop some some polish onto the water surface.  Don't hold the brush to high above the water or the polish will sink to the bottom.  I found 3 drops worked well for the black polish.

    Step 4: Wait a few seconds until the polish spreads out.

    Step 5: Spray a single spray of hairspray at the polish.  I found spraying from about 6" away worked well.

    Step 6: Wait a few seconds for the spotted pattern to form.  It won't look exactly the same every time.  Either of the two pattern types below are fine.

    Step 7: Dip your nail into the polish pattern.  I found that holding my nail at a slight angle and dipping it straight down worked well.

    Step 8: While your nail is still underwater drag a toothpick around your finger to gather up any polish that's still floating.

    Step 9: Pull your finger out of the water.  It's gonna be messy.

    Step 10: Repeat for all of your nails.

    Step 11: If you want a second marbling colour repeat again for all of your nails with a different polish colour.

    Step 12: Clean up.  I used acetone remover and cotton pads to clean up most of the polish off my skin and then used a q-tip dipped in remover to clean up close to the edges.

    Step 13: Add a coat of your favorite top coat.

    y