Hello readers,
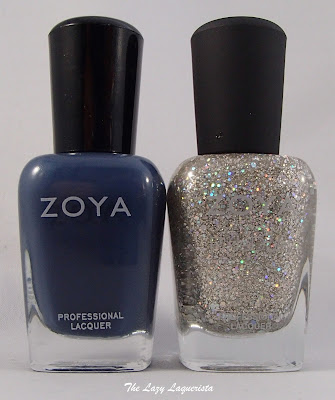
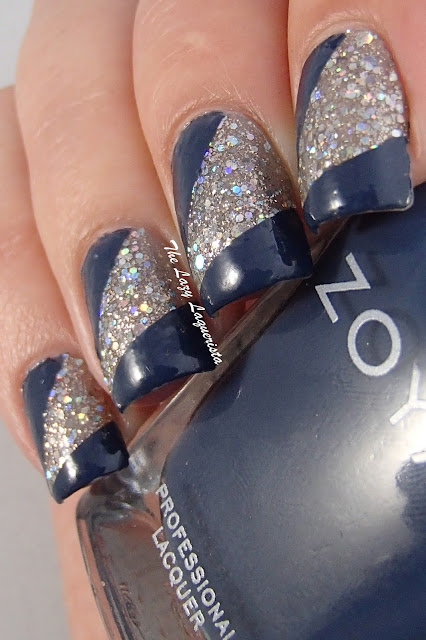
Today I have some more nail art to show you. I broke out the striping tape a some creme and glitter polish to create this look. I used Zoya Cosmo for the base colour and Zoya Natty for the colour blocking.
To make this look I started with my Zoya Cosmo mani that I had already been wearing for a couple days. I added a coat of HK Girly top coat to smooth everything out and let it dry completely. I then marked out the are on the tip that I wanted to fill with my creme polish with striping tape. After painting the tip I removed the striping tape while the polish was still wet. I then waited for the tips to dry and repeated the process at the side of the nail. Finally I topped everything with another coat of HK Girl top coat. Photos show this mani in daylight spectrum lighting.
Happy polishing,
Michelle
November 13, 2014
Angular Colour Blocked Nails
Labels:
Blue
,
Creme
,
Glitter
,
Nail Art
,
Nail Polish
,
Silver
,
Striping tape and nail vinyls
,
Zoya
July 29, 2014
Summer Of Untrieds Day 28: Shimmer - SuperChic Lacquer Hot Springs Dipping Hole & Indigo Bananas Electric Unicorns featuring Neverland Lacquers Nail Stencils
Disclaimer: These nail stencils were offered at no charge to manicuremanifesto.com in exchange for published reviews. All reviews are fair, honest and reflect my personal opinion.
Hello readers,
Today I have another mani trying out some nail stencils from Neverland Lacquers. I combined it with my shimmer polishes for day 28 of the summer of untrieds polish to get a nice wavy accent nail.
Hot Springs Dipping Hole features a sky blue base with tons of blue shimmer and pink microflakes. The formula was easy to apply and took three coats to become opaque. It does dry somewhat matte so you'll need a top coat if you want a glossy finish. I then used the Neverland Lacquers wave stencils to add stripes of Electric Unicorn which has a medium purple base packed with green shimmery microflakes. Finally, I used my silver nail art striper to add thin waves in between the stenciled waves. Everything was then topped off with one coat of HK Girl. Photos show the above mani in natural lighting.
I love the flecked finish of both these polishes but the pink shimmer in Hot Springs Dipping Hole was very difficult to capture on camera. I'm also really happy with how the wave design turned out. Now that I'm getting the hang of the nail stencils they're becoming quite easy to use. The key is the get the accent polish on fast and then pull off the stencils while the accent polish is still completely wet.
Happy polishing,
Michelle
Labels:
#summerofuntrieds
,
Blue
,
Challenge
,
Indie
,
Indigo Bananas
,
Nail Art
,
Nail Polish
,
Neverland Lacquers
,
Shimmer
,
Striping tape and nail vinyls
,
SuperChic Lacquer
,
Swatch
July 03, 2014
Summer Of Untrieds Day 3: Creme - Featuring Neverland Lacquers Nail Stencils
Disclaimer: These nail stencils were
offered at no charge to
manicuremanifesto.com in exchange for published reviews. All
reviews are fair, honest and reflect my personal opinion.
Hello readers,
Today I managed to combine my summer of untrieds challenge theme with a review of a new brand, Neverland Lacquers. They sent me an assortment of nail stencils to try out and today I attempted my first stenciled mani - chevrons.
I started by painting all my nails with three coats of Smokey Mountain Lacquers Teal Me What?, topping it with one coat of HK Girl and waited for everything to dry completely. I then added the chevron sticker stencils to my ring fingers and made sure to press them down firmly. I dabbed a coat of Sally Hansen White On overtop and then peeled of the stencils.
The key seems to be to do one nail at a time since you want to peel the stencils off while the top polish is still as wet as possible. Because I was taking photos of the process the white polish got a bit tacky which resulted in my lines not being quite as crisp as possible. On my non photo hand where I peeled the stencils off asap the lines were even nicer. After peeling off the stencils and letting the white polish dry I added one final coat of HK Girl. Photos show the resulting mani in natural lighting.
I'm really happy with the final look especially considering this was my first attempt. I'm sure with a little practice I'll get those edges even crisper. As for the polishes, Smokey Mountain Lacquers Teal Me What? is quite pretty but due to a bad customer service experience I am unlikely to ever order from them again. I had heard lots of great things about Sally Hansen White On and I'm glad I picked it up. A white that goes opaque easily is hard to find.
Happy polishing,
Michelle
Labels:
#summerofuntrieds
,
Challenge
,
Indie
,
Nail Art
,
Nail Polish
,
Neverland Lacquers
,
Smokey Mountain Lacquers
,
Striping tape and nail vinyls
,
Teal
,
White
January 04, 2014
Striping Tape - Episode I
Hello readers! I've had some striping tape sitting around for a few months but hadn't worked up the time/nerve/courage to actually give it a try. In honor of my 'Moar Nail Art!' new years resolution I decided to take the plunge. The results were... better than I anticipated.
Based on reading other nail blogs and forums there were two key tips that stood out. 1) Wait until your nails are 100% completely dry before taping. Not dry to the touch or just after using a fast drying topcoat. Dry all the way through. I used a mani that I had already had on for a few days already as my base colour, so no issues there. 2) Make sure you pull the tape off while the polish is still when for crisp edges. Ok, I think I can handle that. I used Enchanted Polish Octopus's Garden as my base colour and China Glaze Cords as my taped accent colour. Here's what I came up with and how I did it.
I really happy with this, especially for the first try. As long as you make sure that your base polish is 100% dry and you peel the tape off while your accent polish is still wet striping tape isn't so hard. I could see it being a small nightmare though if you didn't adhere to those two guidelines though. Have you given striping tape nail art a try? Do you have any must know tips to make it any easier? I need to scour the interwebs now for other striping tape designs that catch my eye and can go on the "nail art to try" list.
Happy Polishing!
- Michelle
1) Tape a star pattern onto your nails using three pieces of striping tape. For my design the pieces didn't really need to extend up past the top of my nails, but I found that made it easier to pull them off later. I also taped up both hands right from the start.
2) Use your accent polish (CG Cords for me) to fill in the three triangles at the bottom of your nail. Then while the polish is still wet, peel off the striping tape. For this design I found painting a whole hand and then removing the striping tape from that hand after worked alright. Then, just repeat for the other hand.
3) I wanted to go a little further with my design so I used a small nail art brush to paint a smaller triangle of the base colour (EP Octopus's Garden for me) inside the center taped triangle.
4) Wait for the polish to become tacky/not easily smudge-able and then add your favorite top coat.
I really happy with this, especially for the first try. As long as you make sure that your base polish is 100% dry and you peel the tape off while your accent polish is still wet striping tape isn't so hard. I could see it being a small nightmare though if you didn't adhere to those two guidelines though. Have you given striping tape nail art a try? Do you have any must know tips to make it any easier? I need to scour the interwebs now for other striping tape designs that catch my eye and can go on the "nail art to try" list.
Happy Polishing!
- Michelle
Labels:
China Glaze
,
Enchanted Polish
,
Nail Art
,
Nail Polish
,
Striping tape and nail vinyls
,
Tutorial
,
Tutorial - Nails
Subscribe to:
Posts
(
Atom
)


